Pages

Tuesday, November 15, 2011

Lentil Soup, Writing and Commiserating

I am very pleased to welcome Tricia and Siana of 2GirlsOnaBench to our humble kitchen this morning. Get out your Dutch oven and a well rounded bottle of wine--we're making soup!


TRICIA
I’m on day three of not washing my hair and it’s not looking good.

SIANA
Cut these potatoes.

TRICIA
You can do that, you can not wash your hair for three days, but I can’t. But I don’t care I’m just hanging out with you.

SIANA
Stir this wine in.  And drink some too.

We’re making lentil soup.  We haven’t seen each other in weeks because we’ve been quarantined from colds and then busy, and then family weekend events and then whatever.

We should be writing but, well, we’re making soup instead. This soup recipe has been handed down from Spain to us, which we have modified from college dorm room to apartment to house.  In that order.

TRICIA
Remember in our first apartment when you made this and then left the chopped bell pepper in the fridge for like three weeks. It smelled and then everything tasted like bell pepper.  Even the butter, the butter tasted like bell pepper. And it was all your fault.

SIANA
Yeah, well, remember when we made it in our dorm room and you put it in the crockpot and it boiled over and was a mess on the floor because we didn’t have a kitchen. It smelled and you left it there for three weeks.

We love lentil soup, Siana got the original recipe from her host mother when she studied abroad in Spain and we’ve been modifying it for the last many years. We always make it together because our spouses don’t really like it so we just make a lot and share it.

Here’s the recipe:

1 bag of dried lentils
1 carton of chicken stock (vegetable stock works too)
2 cups of water (add more if needed)
2 potatoes diced (Yukon golds or red potatoes work best)
2 ribs of celery diced
½ onion chopped
2 carrots diced
1 green bell pepper diced
3 cloves of garlic chopped
2 teaspoons kosher salt
1 teaspoon pepper
½ cup red wine
2 Tablespoons olive oil


 Saute onions, celery, carrots and garlic in olive oil in a dutch oven or big soup pot.

  Add potatoes, bell pepper, lentils, chicken stock, water and salt and bring to a boil.


Simmer for at least 1 hour, maybe more.  You may need to add more water if it starts to look like it’s getting dry or thick.  Towards the end, add the wine and then drink the rest. It may also take more than one hour, monitor the simmering process, it seems to have taken us a long time to make this, but we’ve also been talking and drinking wine while we’re simmering.

Serve soup with crusty bread and enjoy.  You can add a drizzle of olive oil on top if you feel dangerous. Just do it, we’ve been inspired by Barefoot Contessa, she always does that with soup. Go crazy.

TRICIA
Mmmmm

SIANA
Yum

So we didn’t write anything except this recipe. But we decided that’s better than nothing.  We’ll tackle our script next week. Or maybe after Thanksgiving. Or after Christmas.  Oh hell, after New Years, who are we kidding?


2girlsonabench.com - Two women, trying to write, make films, maintain full time jobs, hilarity ensues! 
Follow us on Twitter: @2girlsonabench
Join us on Facebook: 2 Girls on a Bench and our snacking and recipe page The Bench Snackbook


Tuesday, November 8, 2011

From Marie Callender to homemade, there was always Chicken Pot Pie.

My love for cooking waxes and wanes.

In the beginning, when I first moved to Wisconsin and shared living space with three bachelors (one of whom I had dibs on), any time spent in the kitchen was more cumbersome than fun. None of us really wanted to cook, but we all wanted to eat. So, our meals came frozen from Marie Callender or vacuum-sealed by Ramen or boxed up and tossed into a paper bag marked with the name of the restaurant on the corner. We cycled through the pizza oven, microwave, and one saucepan but rarely paid attention to the dishes in the sink, which would explain why the kitchen was low on the list of places to hang out.

Later, my husband and I married and moved into a one bedroom apartment, and I marveled at the sight and size of the oven: fit for a kid but with a real working gas range and oven space just big enough to tease you into thinking you were really cooking. I tried my hand at formal dinners, removing all but one oven rack to squeeze in a turkey for our first Thanksgiving, and later sweating over the miniature range to cook chicken and carrots. It took a long time to learn the art of getting every dish onto the table at the same time, warm and well...done.

After a few years, a bit of confidence, and a subscription to Martha Stewart Magazine and Cooking Light, I delighted in a little cooking glory. I baked brownies to die for, cooked a Mexican Casserole made with green chiles and chicken that had to be doubled when family ate over, pureed Creamy Asparagus Soup that looked just like the photo and was worthy of a repeat. I discovered an easy Chicken Potpie recipe that could be prepared the night before and thrown in the oven for dinner the next day, giving the appearance that I spent hours on the meal. My Pecan Pie didn’t rival my grandmother’s but elicited oohs and ahhs just the same.

Life in the kitchen was full.

Then, tiny hands graced our breakfast island, and finicky taste buds resulted in too many leftovers. Wanting my kids to "just eat something," I fell victim to the boxed food aisle at the grocery store again. We cycled through fish sticks and tacos and breakfast for dinner (I write that in past tense, though often our weekly menu still rotates through these dishes). We survived on quick, easy, and bland. Making dinner, and eating it, was a chore.

But as my kids grow older and become a little more willing to try new things, I feel the pull towards bigger, brighter, and more exciting menu choices. Maybe not Creamy Asparagus Soup (yet), but I might bring back some old standards like Chicken Potpie -- dishes that say "easy" and "gourmet" at the same time.

I mean, who can resist the pie?

OLD-FASHIONED CHICKEN POTPIE 
(ripped from the pages of an old Cooking Light issue over ten years ago) 

Crust (in a pinch, which is often, I use a store-bought crust, and that works just as well).
1 cup all-purpose flour, divided
3 tablespoons ice water
1 teaspoon cider vinegar
1/4 teaspoon salt
1/4 cup vegetable shortening

Filling
3 cups Chicken Stock, divided
2 1/3 cups cubed red potato (about 1 pound)
1 cup (1/4 inch thick) sliced carrot
2 teaspoons butter
1/2 cup chopped shallots or onions
1/2 cup all-purpose flour
2 cups diced cooked chicken
1 cup frozen petite green peas
3/4 teaspoon salt
1/4 teaspoon dried thyme
Dash of black pepper
Cooking spray

  1. To prepare crust, lightly spoon 1 cup flour into dry measuring cups; level with a knife. Combine 1/4 cup flour, ice water, and vinegar in a small bowl. Combine 3/4 cup flour and 1/4 teaspoon salt in a large bowl; cut in shortening with a pastry blender until mixture resembles coarse meal. Add vinegar mixture; stir, just until moist. Press mixture gently into a 5-inch circle on heavy-duty plastic wrap; cover with additional plastic wrap. Chill for 15 minutes. Roll dough, still covered, into a 13x10-inch oval. Place dough in freezer 5 minutes or until plastic wrap can be easily removed.
  2. Preheat oven to 400 degrees.
  3. To prepare filling, bring 2 1/2 cups Chicken Stock to a boil in a medium saucepan. Add potato and carrot, cook 2 minutes. Drain mixture in a colander over a bowl, reserving cooking liquid.
  4. Melt butter in a large nonstick skillet over medium heat. Add shallots; cook 3 minutes. Lightly spoon 1/2 cup flour into a dry measuring cup; level with a knife. Combine 1/2 cup flour and 1/2 cup Chicken Stock; stir with a whisk. Add to skillet. Stir in potato mixture, reserved cooking liquid, chicken, peas, 3/4 teaspoon salt, thyme, and pepper. Cook 10 minutes. Remove from heat; cool slightly. spoon chicken mixture into a 1 1/2-quart casserole dish coated with cooking spray. Removed 1 sheet of plastic wrap from dough. Place dough on top of chicken mixture pressing to edge of dish. Remove top of plastic wrap. Cut 5 slits in top of crust to allow steam to escape. Gently brush crust with milk. Bake at 400 degrees for 45 minutes or until golden. Let stand 10 minutes.
What’s your favorite throw-together, toss-in-the-oven, feel-fancy and gobble-it-up kind of dish?

(Below, the Hillbilly Gypsies perform "Crow Black Chicken")


“Easiest work that ever I done was eatin' chicken pie.”

Tuesday, November 1, 2011

American Stew Pot


Home is where one starts from. T.S. Eliot

Growing up there wasn't anything I wanted more than to move to New York or LA and live a ferocious life. After High School I read "On the Road", dreamed technicolor dreams of what it meant to be free and writing out the poetry of unhindered travel--a wild-eyed bard in a VW bus heading away. I went to Colorado for a time, got smacked out of my reverie, and came back to Wisconsin six months later.

There's something to be said about having a home base, a thing that gets overlooked in the wide eyes of America's road hungry dreams.  Since capsizing in Colorado I've traveled back and forth across the country's bumps and bridges--thrilled at the outset, exhausted at the end. Every time I've come back home I've felt lucky for my walls and bed, and thirsty for the familiar.

My husband and I have settled our nest in a small town south of Madison, a place from where we stretch and return with a yard and side walks and trees and snow. We revel in our Main Street holidays, and our stew pot nights. We eat soup by the ladle full paired with a very fine beer.


Winter Squash Corn Curry Soup

1 Butternut and 1 Acorn Squash (Winter squash of your choice or squash and sweet potato!)
1 Cup fresh or frozen corn kernels                                                                                                                1/2 Medium onion, finally chopped
2 Cups chicken or vegetable stock                                                                                                            
1 T Curry Powder                                                                                                                                       Garam Masala, Salt, and White Pepper to taste
1 1/2 Cups Heavy Cream, Evaporated Milk, Milk or Milk substitute 

Preheat oven to 400. Halve and seed squash. Lightly grease baking pans (have some kind of edge to hold juice in) and place squash cut-side down for roasting. Bake 25-35 minutes, until squash is tender to poke with fork.

Meanwhile, prepare onion and sweat on low in soup pan with butter and corn. When squash is tender, cool and scrape into onion mixture.

If you have an immersion blender, add milk and curry at this time and blend until smooth. If you do not have an immersion blender, add milk and squash mixture in batches to blender or food processor and puree until smooth. Return to soup pot.

Add stock and warm on stove, but don't bring to a boil. Season to taste.      

Remember to become a follower of Writing Up an Appetite for a chance to win one of these three books

One title will be given away when we reach 50, 100, 150 followers


Tuesday, October 25, 2011

Five Little Pumpkin Recipes

by Lisa

It is pumpkin season! As we learned last week, October's favorite orange fruit (yes, it is a fruit!) is good for more than just carving. Here are some other facts about Jack you might not have known (from the University of Illinois Extension):
  • Around 90 to 95% of the processed pumpkins in the United States are grown in Illinois.
  • Pumpkin flowers are edible.
  • The largest pumpkin pie ever made was over five feet in diameter and weighed over 350 pounds. It used 80 pounds of cooked pumpkin, 36 pounds of sugar, 12 dozen eggs and took six hours to bake.
  • In early colonial times, pumpkins were used as an ingredient for the crust of pies, not the filling.
  • Pumpkins were once recommended for removing freckles and curing snake bites.
  • The largest pumpkin ever grown weighed 1,140 pounds.
  • The name pumpkin originated from "pepon" – the Greek word for "large melon."
  • Pumpkins are 90 percent water.
  • Eighty percent of the pumpkin supply in the United States is available in October.
And then there is the singing:


Of course, if you insist on cutting into these fat little darlings, do it in Death Star style (thanks to my friend Jane for the tip!).

Finally, I want to share some of my favorite pumpkin recipes, all egg-free and most sweetened with the season's maple syrup, to take you from breakfast to dessert, adapted from an article I first published in Vegetarian Gourmet. Enjoy!


Mini Pumpkin Johnnycakes

Top with extra maple syrup or warm cinnamon applesauce. Makes 20 small pancakes.

Dry Ingredients:
  • 1/2 cup whole-wheat pastry flour
  • 1/2 cup yellow cornmeal
  • 1 Tablespoon powdered egg replacer (or omit, and replace 1/4 cup of the milk, below, with one medium egg, beaten and added with the pumpkin)
  • 1 teaspoon baking powder
  • 1/4 teaspoon baking soda
  • 1/2 teaspoon pumpkin pie spice
  • 1/4 teaspoon salt, optional
Wet Ingredients:
  • 2 teaspoons lemon juice
  • 1 1/4 cups milk or soymilk
  • 2/3 cup cooked, pureed pumpkin or canned pumpkin
  • 2 Tablespoons maple syrup
  • 1 Tablespoon canola or other oil
1. Whisk dry ingredients together in a medium bowl. Set aside.
2. Whisk lemon juice and milk together in a small bowl. Let sit for 5 minutes.
3. Stir remaining wet ingredients into milk mixture, then pour wet ingredients into dry ingredients, and whisk lightly until just combined.
4. Heat a lightly oiled large skillet. Drop batter 2 Tablespoons at a time onto skillet. Gently flip pancakes when the underside is browned. Serve.


Not-Overly-Sweet Pumpkin Banana Walnut Bread

Makes one loaf.
Dry Ingredients:
  • 2 cups whole-wheat pastry flour
  • 2 teaspoons baking powder
  • 1 teaspoon cinnamon
  • 1/2 teaspoon nutmeg
  • 1/2 teaspoon salt
Wet Ingredients:
  • 2 ripe bananas, mashed
  • 1 cup cooked, pureed pumpkin or canned pumpkin
  • 1/4 cup pure maple syrup
  • 1/4 cup canola or other oil
  • 1 teaspoon vanilla extract
1/2 cup chopped walnuts (or chocolate chips)

1. Preheat oven to 350 degrees F. Lightly oil a medium loaf pan. Set aside.
2. Sift or whisk dry ingredients together in a medium bowl. Set aside.
3. Whisk remaining ingredients (except walnuts) in a bowl until smooth. Stir wet ingredients into dry ingredients until just combined. Fold in walnuts or chocolate chips.
4. Spoon batter into prepared pan. Bake until a knife inserted in the center comes out clean, about 50-60 minutes. Cool on a wire rack before slicing.

Pumpkin Miso Soup

Makes four servings.
  • 2 Tablespoons mellow white miso
  • 2 Tablespoons water
  • 3 scallions, finely chopped
  • 1 Tablespoon minced gingerroot
  • 2 teaspoons peanut or sesame oil
  • 2 cups cooked, pureed pumpkin or canned pumpkin
  • 2 cups vegetable broth
  • 1 cup water (or, for a creamy version, milk or unsweetened soymilk)
1. Mix together miso and 2 Tablespoons water in small bowl. Set aside.
2. Sauté scallions and ginger in peanut or sesame oil in a large saucepan for 3-5 minutes.
3. In a blender or food process, blend pumpkin with sautéed scallions and ginger until smooth. Transfer back to pan.
4. Add broth and water (or milk). Whisk until smooth, and simmer for about 10 minutes. Stir in miso mixture. Serve immediately.

Easy Halloween Pudding

Black and orange stripes make this pudding a treat for kids of all ages. Makes four servings.

Pumpkin Pudding:
  • 1 10.5-ounce package firm silken tofu
  • 1/2 cup cooked, pureed pumpkin or canned pumpkin
  • 1/3 cup pure maple syrup
  • 1 teaspoon pumpkin pie spice
Spiced Cocoa Pudding:
  • 1 10.5-ounce package firm silken tofu
  • 1/3 cup pure maple syrup
  • 2 Tablespoons cocoa (or carob) powder
  • pinch of cinnamon
  • pinch of cardamom
1. To make the pumpkin pudding, blend ingredients in a food processor until smooth. Transfer to another bowl, and rinse the blending container.
2. To make the cocoa pudding, blend ingredients in a food processor until smooth.
3. To assemble, spoon about 1/8 of pumpkin pudding, followed by 1/8 of cocoa pudding into each of 4 parfait glasses. Continue alternating until each has four stripes. Chill for at least 4 hours of overnight.

No-Bake Pumpkin Peanut Cheesecake

Makes 10 servings.
  • 2 Tablespoons peanut (or almond) butter
  • 2 Tablespoons melted butter
  • 6 ounces graham crackers
  • 2 cups cooked, pureed pumpkin or canned pumpkin
  • 1 10.5-ounce firm silken tofu
  • 2/3 cup pure maple syrup
  • 1/4 cup peanut (or almond) butter
  • 1 Tablespoon pumpkin pie spice
  • pinch of salt
  • 1 cup water
  • 1 1/2 Tablespoons agar powder (or gelatin)
1. Lightly oil a 12" springform pan. Set aside.
2. Mix together 2 Tablespoons peanut (or almond) butter and 2 Tablespoons melted butter in a small bowl. Set aside.
3. Grind graham crackers in a food processor or blender until they form very small crumbs. Transfer crumbs to a mixing bowl and mix in peanut butter mixture until coarse crumbs form. Press firmly into bottom of prepared pan. Set aside.
4. Puree pumpkin, tofu, maple syrup, peanut or almond butter, pie spice, and salt in a food process or blender. Do not transfer mixture. Set aside.
5. Simmer one cup water and agar or gelatin in a small saucepan for 3 to 5 minutes, whisking constantly. Immediately add to pumpkin mixture, and blend until smooth.
6. Pour filling over crust and smooth the top. Chill overnight.

Tuesday, October 18, 2011

Day trips and pumpkins lead straight to the kitchen.

This blog is the perfect venue to introduce you to a dear friend and a food confidante: Sarah, author of the blog Celiac in the City. Sarah and I work our day jobs together, but during our off times - or during a spontaneous coffee run - we talk food. Food allergies. Food substitutions. Food frustrations. I'm the mom of a child with egg and nut allergies, and Sarah faces her own personal food challenges. She doesn't let it get to her, though. In fact, she's embraced the challenge by starting up a blog of her own and converting recipes like a pro.

Who am I kidding, she is a pro. She's my go-to person. And, if you're looking for gluten-free recipes, or restaurants with gluten-free menus, or some gluten-free fun (she organizes a get-together every month in our area), then Sarah should be your go-to person, as well.

Today, Sarah dresses up her guest post with some lovely photos and teases our tastebuds with a dee-lish recipe.

*****

Hello, Writing Up an Appetite friends!

Happy to be hanging out over here today – honored that Christi asked me to stop by and do a guest post. My home territory is over at Celiac in the City – A girl. Gluten free. Loves food. Will travel. That pretty much sums up who I am. Feel free to stop by sometime and check in on my latest adventures.

Two weekends ago, we were out on the Harley, in short sleeves. Warm rays on our faces. Camera strapped securely around my neck. Snapping pictures of the changing season.


As I edited the photos, I found this one, at the very end of them all.


Not only did it make me smile – watching the kiddos run around at the pumpkin farm, on a mission to find THE best pumpkin, but it also gave me an idea for today’s post.

It was nearly 80 degrees that day. And although I loved every minute of that weather, as the heat kicked in this week, I was reminded that fall has arrived (with high heat bills to follow).

One way I ease my summer-lovin’ self into fall is baking.

And lots of it.


These pumpkin spice cookies will heat up your place and make it smell heavenly. You will be tempted to eat one right out of the oven. As an experienced baker the girl who burned her tongue eating one straight from the oven, I will tell you this is not the best idea.


They are moist cookies. Very moist. So you don’t want to put them in a sealed container to store them. Just leave them out or drape a towel over the tray.

You’ll notice the recipe uses gluten-free flours. It’s how I roll. Because I have Celiac Disease, my baking world has seen some changes over the last three years. If you are able to eat regular, all-purpose flour, then by all means you sure can. Just use 2 ½ cups of all-purpose flour instead of the GF flour blend and xanthan gum.

Let’s warm up your kitchen.

Pumpkin Spice Cookies with Maple Cream Cheese Frosting
Makes approx. 36 cookies

Pre-heat oven to 350 degrees. Unless you bake using a Silpat, (or other baking mat) you will need to grease your baking sheets.

12 oz gluten-free flour blend: 4oz each of sorghum flour, sweet rice flour & tapioca starch (or 2 ½ cups of all-purpose flour)
*you can use a mixture of any gluten-free flours/starches: white/brown rice flour, millet flour, potato starch, cornstarch, etc.

1 teaspoon xanthan gum (omit if using all-purpose flour)
1teaspoon baking soda
1 teaspoon baking powder
¼  teaspoon salt
2 teaspoons pumpkin pie spice
½ teaspoon cinnamon
¼  teaspoon ground ginger
*you can play with the spices, use nutmeg, allspice, etc. instead of the pumpkin pie spice, or use a mixture of both, as I did here)

½  cup sugar
½  cup brown sugar
1 egg (see egg substitutes here)
½  cup butter softened
1 ½  cup pumpkin puree
1 teaspoon vanilla extract

Combine flour mix and xanthan gum with baking soda, baking powder, salt and spices. Set aside. Cream sugars and butter. Add in pumpkin, egg,  and vanilla. Beat until nice and smooth. Slowly add in flour mix, until well blended. Drop by tablespoons onto baking sheets.

 Bake 15-18 minutes, or until bottoms are lightly browned and cookies are firm enough to hold their shape. (I used a 1 ½ tablespoon scoop for mine, so they took around 18 minutes) You might like yours baked a tad longer. Go for it. Let them rest a few minutes on the baking sheet, then transfer to cooling racks. When cooled completely, frost.

Maple Cream Cheese Frosting
The thing about frosting is that you can make it any way you’d like. So take these measurements as a guide. Throw it all in a bowl and beat ingredients to your desired texture.

2 cups powdered sugar
1 package cream cheese
1/4 cup butter
2 tablespoons real maple syrup
1 teaspoon cinnamon (or pumpkin pie spice, or skip it if you’d like)

Maybe frosting isn’t your thing (it shocks me when people say this). That’s okay too, you can serve them up with just a sprinkle of powdered sugar.

Now grab a cup of coffee or a chai. I recommend eating at least two.

Read more from Sarah, “Celiac in the City,” on her website, www.celiaccity.com, like her page on Facebook, or follow her on Twitter @celiacinthecity.


Tuesday, October 11, 2011

When Cooking Takes You to the Dark Side

Some days, nothing about cooking is fun. Maybe you've been there, when the day runs long and complaints pile high and you shift from refrigerator to pantry, and back again, and repeat the "tired momma" mantra: I got nothin'.

Oh, I've got refried beans, I think. And a box of noodles. And a big bag of rice.

Blah. Boring. Boo.

Not even that open package of Oreo Cookies induces excitement.

It's that same feeling I get when I stare, long and hard, at the opening paragraphs of a story I'm sweating over: there's promise in the skeleton ingredients on the page, but the energy is missing. I need a shake-up. Some spice. A little action.

Or, action figures.

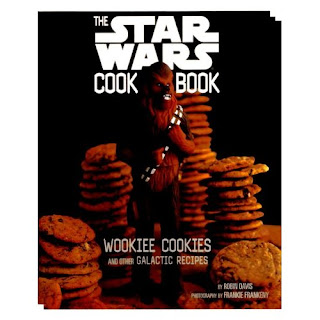
I could learn a lot from cookbooks like this one:

"...and other Galactic Recipes"...I love that.
The official book, as seen on Amazon.
Who knew Jawas liked milkshakes?

This gem of a book was discovered by my son in his school library, and it's filled with spice and action.  Recipes range from Greedo's Burritos to Jawa Jive Milkshakes to Chewbacca's weakness -- Wookie Cookies. I'd love to tell you that we started cooking with Greedo's Burritos or Boba Fett-uccine, but I cook for kids. Certain days, we cut right to the sugar. Right to Chewbacca.

WOOKIE COOKIES

(The official recipe from The Star Wars Cookbook, by Robin Davis)


Ingredients
2 1/2 cups all-purpose flour
1 teaspoon baking soda
1 teaspoon salt
1 teaspoon ground cinnamon
1 cup unsalted butter, at room temperature
1 cup packed brown sugar
1/2 cup granulated sugar
2 large eggs (or the right mix of Ener-G if you need an egg substitute like we do)
1 1/2 teaspoons vanilla extract
1 cup milk chocolate chips
1 cup semi-sweet chocolate chips

  1. Preheat oven to 375 degrees.
  2. Put the flour, baking soda, salt, and cinnamon in a mixing bowl. Stir with the wooden spoon until well mixed. Set aside.
  3. Put the butter, brown sugar, and granulated sugar in another mixing bowl. Using the electric mixer set on high speed, beat together until well blended and creamy, about 3 minutes. (You can do this with a wooden spoon, but it will take longer) Beat in the eggs and vanilla extract. Add the flour mixture and stir with the wooden spoon until blended. Stir in the chocolate chips.
  4. Scoop up a rounded tablespoonful of the dough and drop onto a baking sheet. Repeat until you have used up all the dough. Be sure to leave about 1 inch between the cookies because they spread as they bake.
  5. Using pot holders, put the baking sheets in the oven. Bake until golden brown, about 10 minutes.
  6. Again, using pot holders, remove the baking sheets from the oven. Lift the cookies from the baking sheets with a spatula, and place on cooling racks. Cool completely.

Eat heartily.

And remember, don't get too serious, whether you're standing at the pantry door or staring at a story's first draft.

Tuesday, October 4, 2011

Keep the pilot light burning


I spent the summer of 2001 watching two little boys during the day and waiting tables in a 50's era diner in the evening. It was the completion of my first year of college, though I was already in my mid twenties, and I had reached a point of utter confusion--the English Composition class I was required to take made me start writing again. My pilot light was lit. My journals were uncovered. My passion was stoked.

That was the first time I considered writing a memoir about my family. While the boys played King of the Suburban Backyard I scribbled questions and anecdotes across pages of flimsy spiral notebooks. I had no starting point, no frame of reference and no story, but I wrote and wrote.

For the entire I summer I questioned my motives. I had started out studying interior design and I loved it completely. I relished architecture and art history. I fell in love with space and light. But still, writing was what made me burn.

Before the fall semester commenced I had changed my area of focus.

I've never been a practical girl, I believe all too much in the finite nature of life and the frailty of dreams. Forget fortune. Forget fame. It's the ticking that keeps me going, the beat and hum of one word following another.

***


In the summer of 2001 the boys had a visit from their Florida grandfather. He was taken with notion of my vegetarianism and raved about a black bean taco recipe his wife liked to make. A week after he returned home he sent the following recipe. I've used it many, many times.

Black Bean & Veggie Tacos

Taco Shells (Sprouted Wheat if available)
2 T  Olive Oil
2 T  Fresh Lime Juice
1 t   Ground Cumin
1 t   Minced Garlic
1 t   Ground Red Pepper


1 Can (16 oz) Black Beans
1 Can (7oz) Whole Kernel Corn, Drained
1/2 C Coursely Chopped Carrots
1/2 C Diced Celery
1/3 C Diced Red Onion

Part 2

2 C Shredded Lettuce
1/4 C Sour Cream
4 oz Shredded Cheddar

Prepare taco shells. Whisk together first five ingredients. Add next 5 ingredients. Stir to mix & coat. Layer lettuce, cheese, Viggie mix & sour cream on hot taco shells.